Vendor Management
The vendor management page gives you a bird's-eye view of everyone selling on your marketplace -- their activity, earnings, ratings, and account status.
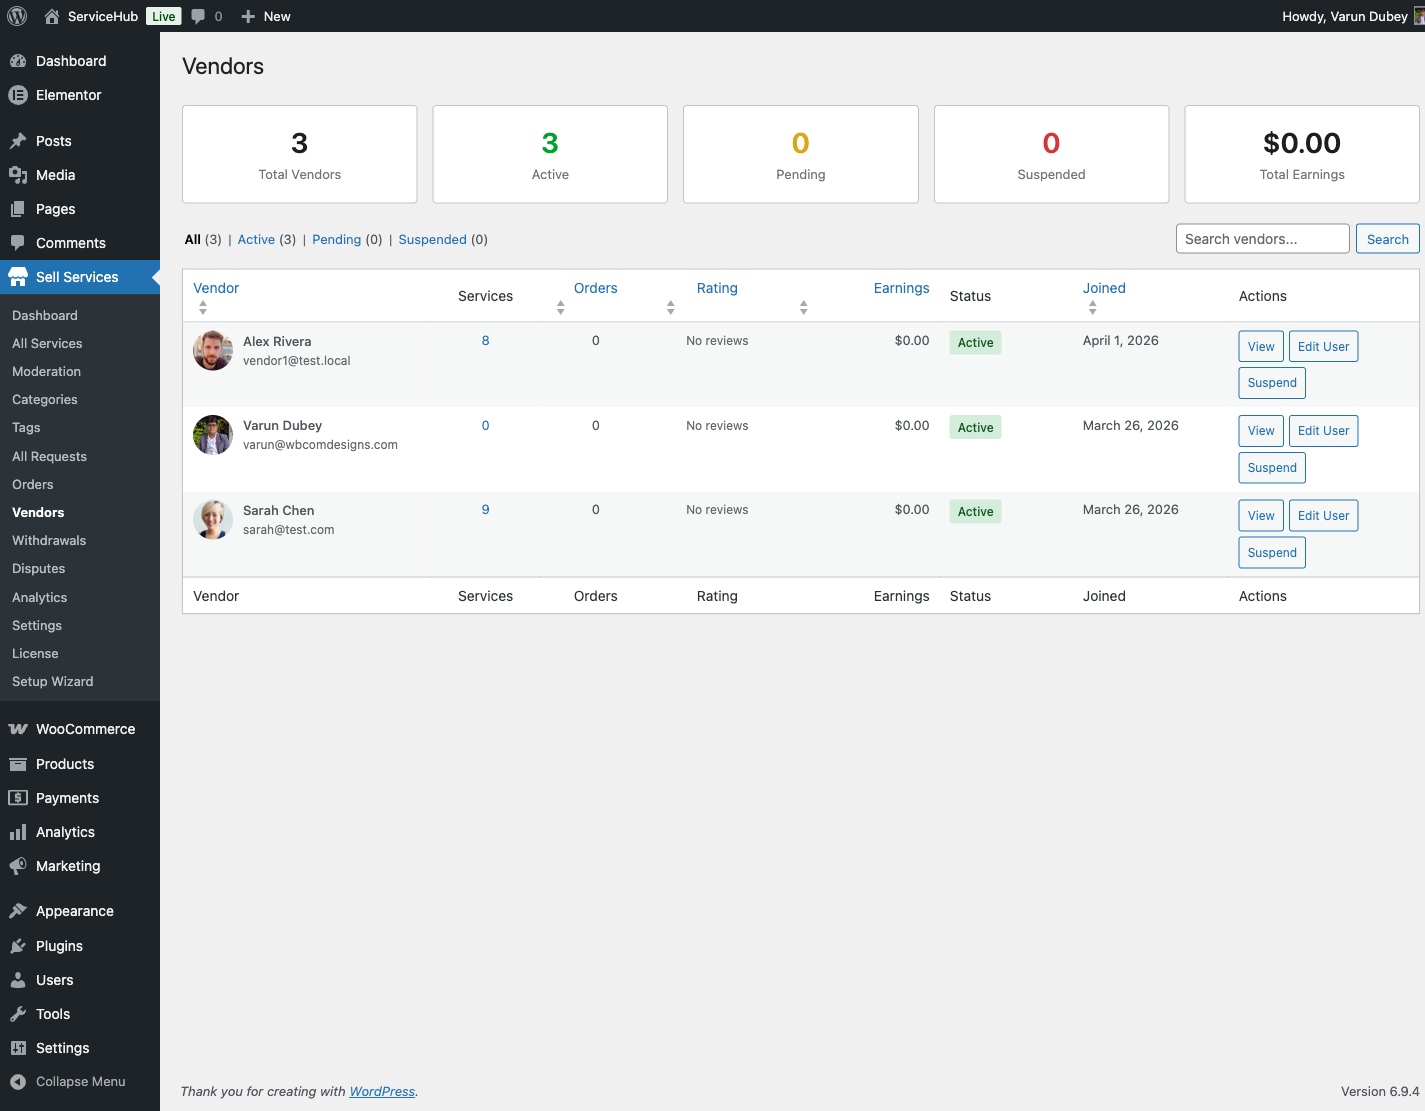
Where to Find It
Go to Sell Services > Vendors in your WordPress admin. You will see a dashboard with key stats at the top and a searchable list of all vendors below.
Dashboard Stats
At the top of the page, four cards summarize your vendor base:
| Card | What It Shows |
|---|---|
| Total Vendors | Everyone who has signed up as a vendor |
| Active | Vendors currently able to sell and receive orders |
| Pending | Vendors waiting for your approval (if approval is required) |
| Suspended | Vendors whose accounts are temporarily restricted |
You also see the average vendor rating and total vendor earnings across your marketplace.
The Vendor List
The main table shows every vendor with these details:
- Name and email -- click a name to view their full profile
- Services -- number of published service listings
- Orders -- total orders completed
- Earnings -- lifetime earnings on the platform
- Rating -- average customer rating
- Level -- seller level badge (based on activity and performance)
- Status -- active, pending, or suspended
- Joined -- registration date
You can sort by name, rating, orders, earnings, or join date. Use the search box to find vendors by name or email.
Filtering by Status
Click the tabs above the table to filter:
- All -- every vendor
- Active -- currently operating
- Pending -- awaiting approval
- Suspended -- temporarily restricted
Vendor Approval
If you want to screen vendors before they can sell, enable vendor verification:
- Go to Sell Services > Settings > Vendors
- Check Require Verification
- Click Save Changes
When enabled: New vendors start with "Pending" status and cannot create services until you approve them.
When disabled: New vendors are active immediately after registration.
Approving a Vendor
- Go to Sell Services > Vendors
- Click the Pending tab
- Click the vendor's name to review their profile
- Click Approve to activate their account
The vendor receives a notification that they can now start selling.
Custom Commission Per Vendor
By default, all vendors share the same global commission rate. But you can override it for any individual vendor:
- Click a vendor's name to open their profile
- Find the Commission Settings section
- Enter a custom commission rate
- Click Update
This is useful for rewarding top performers with lower commission, offering promotional rates, or setting up partnership agreements.
Suspending a Vendor
If a vendor violates your policies or you need to temporarily restrict their account:
- Click the vendor's name
- Change their status to Suspended
Suspended vendors cannot receive new orders, but their existing active orders continue to completion. You can reactivate them at any time by setting their status back to Active.
Vendor Verification Tiers
Vendors can have one of three verification tiers:
| Tier | Meaning |
|---|---|
| Basic | Default tier for all new vendors |
| Verified | Identity or business verified by admin |
| Pro | Top-tier vendors with proven track records |
These tiers appear as badges on vendor profiles, helping buyers identify trusted sellers.
Vendor Detail View
Click any vendor's name to see their complete profile, including:
- Bio, location, and contact information
- All published services
- Order history and performance metrics
- Earnings and withdrawal history
- Review scores and buyer feedback
Related Docs
- Service Moderation -- Reviewing vendor service listings
- Withdrawal Approvals -- Processing vendor payouts
- Commission System -- How earnings are split
- Manual Orders -- Creating orders by hand